AWS Lambda Functions Chaos Engineering - Extending Steadybit - Part 3
This article demonstrates how to implement an attack to inject failures for AWS Lambda and integrate it into Steadybit.
In part 2 of this series, we looked at discovering and identifying the Lambda functions so that we could select them for the attack. In this post, we’ll finally inject failures into the Lambda functions.
How Failure Injection Works
We will use Gunnar Grosch’s (@GunnarGrosch) failure-lambda library for the actual failure injection. We need to wrap our Lambda function handler using this library. (De-)activating the failure injection is done by writing the configuration to the AWS System Manager (SSM) Parameter Store configured for that Lambda function.
The failure-lambda library has several failure injection modes: adding latency, throwing an exception, returning a fixed status code, filling disk space, and denying access to network hosts.
These modes are mutually exclusive, and the best practice is to write an attack for each mode to avoid an over-complex attack configuration. This post will focus on returning a fixed status code when the Lambda function is called.
How Actions work
The extension must provide several endpoints to control the action. We should implement them stateless and not hold any state in the extension. We can return a state from the endpoints, which is included on subsequent calls.
Besides the state, the endpoints may return log messages for the agent log, metrics, or artifacts, which will be attached to the experiment. Those are useful if you want to write actions that integrate with other tools, e.g., load testing or observability, but we won’t need that here.
The endpoints reflect an action’s lifecycle:
- Prepare: This is called just before the action should start and receives the action parameter values and target information.
We can do preparatory work here, but it should not cause harmful side effects.
The most important part is to return a state, which will later be passed to the start and stop endpoint. - Start: When this endpoint is called, we should inject the actual failure.
- Status: This endpoint is optional. We can use this to return metrics/artifacts/log messages while the action is running or to indicate the end of the action. As we know the exact duration before the action, we don’t need to implement this.
- Stop: This is called to stop the action and should roll back any effects. It will even be called when the request to start fails for some reason.
Implementing the Prepare endpoint
In the prepare endpoint, we compute the state for the start and stop using the action configuration and target information.
For the Lambda failure injection, extracting the SSM Parameter name and computing its value is the configuration for failure lambda. We implement the prepare handler in extlambda/action.go:
failureInjectionParam := request.Target.Attributes["aws.lambda.failure-injection-param"]
if failureInjectionParam == nil || len(failureInjectionParam) == 0 {
        return nil, extutil.Ptr(extension_kit.ToError("Target is missing the 'aws.lambda.failure-injection-param' attribute. Did you wrap the lambda with https://github.com/gunnargrosch/failure-lambda ?", nil))
    }

    state := &LambdaActionState{
        Param: failureInjectionParam[0],
        Config: failureInjectionConfig{
        FailureMode: "statuscode",
        Rate: request.Config["rate"].(float64) / 100.0,
        StatusCode: int(request.Config["statuscode"].(float64)),
        IsEnabled: true,
    },
}
Implementing the Start endpoint
We use the state we get passed in from the prepare lifecycle step and put the failure injection config into the SSM Parameter value using the PutParameter() API call. When the Lambda function is called next time, it picks up that configuration. (start handler in extlambda/action.go)
_, err = client.PutParameter(ctx, &ssm.PutParameterInput{
   Name: extutil.Ptr(state.Param),
   Value: extutil.Ptr(string(value)),
   Type: types.ParameterTypeString,
   DataType: extutil.Ptr("text"),
   Description: extutil.Ptr("lambda failure injection config - set by steadybit"),
   Overwrite: extutil.Ptr(true),
})
Implementing the Stop endpoint
We need to remove the SSM parameter using DeleteParameter(), so the next time the Lambda function executes, it won’t inject the failure. If the start fails, the stop will be called nevertheless – so we ignore when the parameter is not found. (stop handler in extlambda/action.log)
_, err = client.DeleteParameter(ctx, &ssm.DeleteParameterInput{ Name: extutil.Ptr(state.Param), }) if err != nil { var notFound *types.ParameterNotFound if !errors.As(err, ¬Found) { return extutil.Ptr(extension_kit.ToError("Failed to delete ssm parameter", err)) } }
Providing Descriptive Metadata for Users
As for the discovery we implemented in part 2, the platform knows nothing about the action. So we provide some metadata for the action.
For the id, we use the targetID with a suffix. The id has to be unique for your Steadybit instance. And we also classify the action as an attack, so the platform and users know it might cause harm.
Id:       fmt.Sprintf("%s.statusCode", targetID),
Kind:     action_kit_api.Attack,
We set a label, icon, and description. These will appear in the experiment editor and should briefly explain to the user what will happen.
Label:       "Inject Status Code",
Description: "Returns a fixed status code.",
Icon:        extutil.Ptr(targetIcon),
We specify the target type the action operates on and provide a selection template. These will appear in the step configuration dialog. The selection template helps users to narrow down their targets faster.
TargetType: extutil.Ptr(targetID),
TargetSelectionTemplates: extutil.Ptr([]action_kit_api.TargetSelectionTemplate{
   {
      Label: "by function name",
      Query: "aws.lambda.function-name=\"\"",
   },
}),
We specify who is in control of the timing for the action. For time control, we have three options:
Instantaneous: We can use this for actions that finish immediately, e.g., kill a process, or reboot.Internal: We don’t know the duration beforehand, and the action tells when it is finished, e.g., rolling restart. When we use this, we have to implement the status endpoint.External: We know the exact duration of the action in advance. The agent will call the stop endpoint at the given time. We must add a duration parameter for this. That is the case in our example. We will use this.
TimeControl: action_kit_api.External
Last but not least, we specify the parameters that this action accepts. These will appear as input values for the user:
{
    Label:        "Duration",
    Name:         "duration",
    Type:         "duration",
    Description:  extutil.Ptr("The duration of the attack."),
    Advanced:     extutil.Ptr(false),
    Required:     extutil.Ptr(true),
    DefaultValue: extutil.Ptr("30s"),
    Order:        extutil.Ptr(0),
},
{
    Name:         "statuscode",
    Label:        "Status Code",
    Description:  extutil.Ptr("The status code to return."),
    Type:         action_kit_api.Integer,
    DefaultValue: extutil.Ptr("500"),
    Required:     extutil.Ptr(true),
    Order:        extutil.Ptr(1),
},
...
Running the attack.
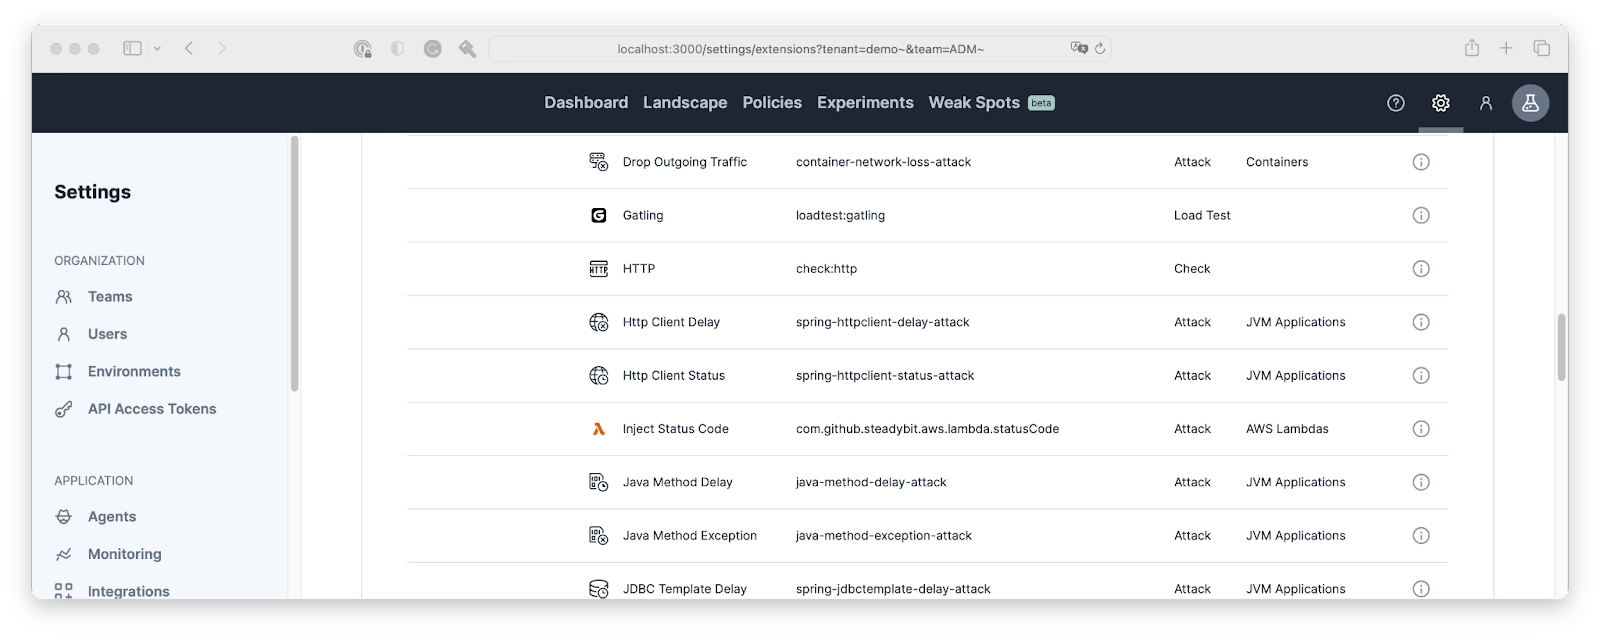
So after deploying the new version of our extension, the Steadybit platform should pick up the new attack. We can verify this by looking at the extension list:
Then we can go ahead, design and execute an experiment using the new attack:
Summary
So, I didn’t expect to find any errors before writing this extension and the blog post. But while playing around with the attack, I found a bug in our exception handling code.
So the thing with lambdas is that they are always available and run flawlessly, so the callers don’t expect them to fail, but when they do – there are untested code paths ahead.
Now we have an additional tool in our toolbox to test this. Injecting HTTP status codes is the beginning; failure-lambda can do much more!
If you are interested in the complete code for this extension, you can find it on github.com/joshiste/extension-aws-lambda.
And after some polishing and adding tests to the code, I’m pretty sure the new attacks will find a way into our official AWS extension.

Get started today
Full access to the Steadybit Chaos Engineering platform.
Available as SaaS and On-Premises!
or sign up with

Book a Demo
Let us guide you through a personalized demo to kick-start your Chaos Engineering efforts and build more reliable systems for your business!